BEEFING UP WEAK PASSWORDS: HOW TO USE A PASSWORD MANAGER
- Kelly Sharadin

- Jun 24, 2021
- 4 min read
Although businesses today are more cybersecurity aware than ever, poor password management is still one of the most common vulnerabilities we see across industries.
The scale of this problem is massive even though it is one of the easiest vulnerabilities to mitigate. In fact, according to Verizon’s Data Breach Investigations Report, 81% of data breaches are related to weak or re-used passwords.
So what can be done to mitigate this highly common but preventable threat to your business?
Mitigating Weak Passwords with a Password Manager
Organizations have a responsibility to help their employees avoid weak password usage and poor password management practices. Unfortunately, many employees have no option other than to memorize the multiple passwords needed in the daily performance of their duties. And while NIST recently updated its guidance on password complexity, length, and periodic change requirements specifically to reduce this challenge, organizations still lack effective policies and password best practices that could support their employees.
This is where a password managers come into play. Password managers – a type of software that stores and organizes passwords – are one of the best mechanisms to safeguard online accounts. A password manager reduces the number of passwords you need to memorize to one master password which provides you access to all the online accounts and passwords recorded within that password manager account. Most password managers have biometric / facial recognition features for ease of access and not only store passwords, but also have a password generator option to automatically create complex passwords based on your company’s policies.
There are many password manager options to consider, ranging from paid corporate password manager accounts to free alternatives that work well for individuals. So whether your business requires a robust corporate solution or needs to scale individually with free options, password managers are a sensible first step to improving password security.
Password Manager Setup Example: KeePassXC
KeePassXC is an excellent option for users and businesses because it is open-source, free, and works on various operating systems. This guide will walk through how to set up and use KeePassXC password manager. Although this tutorial focuses on KeePassXC, this methodology is fairly similar to other password managers.
What you will need:
Computer
USB drive to back up your password database
A checklist of all your accounts and passwords (be sure to properly destroy this checklist once you've set up your password manager)
Perform a security scan on your device to make sure no malware is present using either Windows Security Scan or CleanMyMac X (for macOS)
Note: Perform a clean install and then proceed with the password manager tutorial if you’re unsure whether your machine is infected
Step 1: Download the KeePassXC version that works with your operating system from the KeePassXC website.
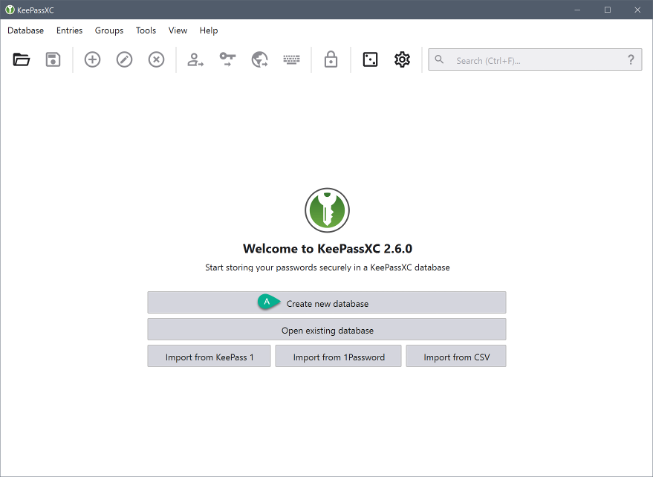
Step 2: Launch KeePassXC. After the install is complete, you will be presented with the following welcome screen (figure 1). Proceed with creating a new database.

Step 3: You will be prompted to name your new database (figure 2). Provide a name and press continue.

Step 4: Accept the default encryption settings and press continue (figure 3).

Step 5: Create the master password to your database (figure 4). It is paramount that you create a complex password (test your password here) and save it somewhere safe because this is the password that will keep all your other passwords safe.

Step 6: Save your new database to your desktop for the time being. This is the main interface of the password manager. Figure 5 below shows a populated database. A good practice for keeping things organized is to group similar accounts (e.g., streaming services, shopping, financial).

Step 7: Begin adding your entries once you have groups properly configured. To do this, use the Entries drop-down menu and select New Entry (figure 6).

Step 8: Select the password block icon on the far end of the password field to automatically generate complex passwords (figure 7).

As you continue to add passwords to your database, make a habit of routinely backing up your database on your USB drive up so that you always have two copies. Congrats - you have now securely set up your password manager!
How to Set Up Browser Integration
KeePassXC allows for web browser integration with its password manager. The KeePassXC-Browser extension lets you automatically populate the entries from your KeePassXC database into the fields on the websites you visit. The KeePassXC Browser extension is available to install for the following web browsers: Google Chrome, Firefox, and Edge.
Step 1: Install the KeePassXC extension in your choice of web browser.
Step 2: Configure your desktop application to communicate with the newly installed extension by opening KeePassXC, navigating to Tools > Settings, and clicking click on the Browser Integration option on the left-hand side (figure 8).
Step 3: Click Enable browser integration checkbox, select the browser you have installed the KeePassXC extension on, and click OK (figure 8). Then restart your web browser and click the KeePassXC browser extension.

Step 4: Click the Connect button to integrate the KeePassXC browser extension with your desktop application of KeePassXC (figure 9).

Step 5: You will be prompted to enter a unique name to identify the connection between your web browser and the KeePassXC database. Type in a name and select Save and allow access (figure 10).

How to Use Browser Integration
Step 1: The desktop application must be open and unlocked to use the KeePassXC browser extension. The KeePassXC icon will present the following states in your browser (figure 11):
KeePassXC is not running or is disconnected.
Connected to KeePassXC, but the database is locked.
Connected to KeePassXC and ready to use.

Step 2: If the KeePassXC desktop application is not connected with the browser extension, click the extension icon in your browser and click Reload (figure 12).\

Step 3: Open the URL you want to use with your database. Ensure the credentials you want to use are checked and click Allow Selected (figure 13).

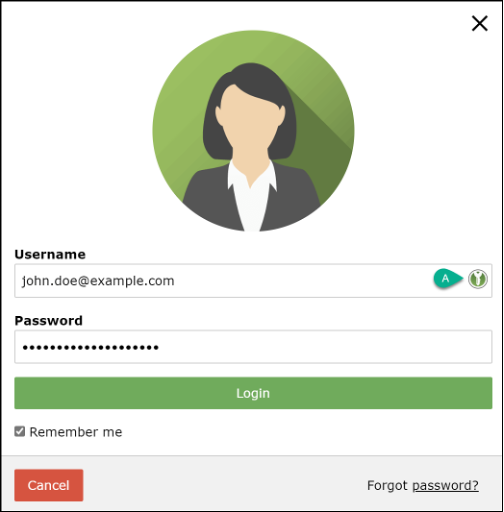
Step 4: The KeePassXC icon will appear in the username field of the login form on the webpage. Click the icon to populate the field with your stored credentials. If you have more than one credential for this website, a dropdown will appear to choose the one to use (figure 14).


Comentários